I had been wanting to make a wrap, and I am such a fan of the granny stitch, I decided to give this a go! Materials Needed: 9mm Crochet Hook OPTIONAL: 1-2 pencil grips , like these , to make your crochet handle more comfortable Bernat Baby Blanket Big Ball Baby Lilac , 2 balls Stitch Marker Tapestry needle (for weaving in ends) Optional: Tassel Maker Pattern: Row 1: Ch 4, in 4th ch from hook 2dc, ch2, 3dc. Row 2: Ch 3 (counts as stitch), turn, 2dc in the first dc, ch 1, 3dc ch 2 3dc in ch2 sp, ch1, 3dc in the top of the ch3 from the previous row. Row 3: Ch 3 (counts as stitch), turn, 2dc in first dc, ch 1, 3dc in ch1 sp, ch 1, 3dc ch 2 3dc in ch2 sp, ch1, 3dc in ch1 space, ch 1 3dc in the top of the ch3 from the previous row. Row 4-25: Ch 3 (counts as stitch), turn, 2dc in the first dc, ch 1, *3dc in ch1 sp, ch1. Repeat from * until you reach the ch2 sp, then 3dc ch 2 3dc in ch2 sp, ch1. Then repeat fro...


I just bought a new laptop! I have been thinking about getting a Chromebook for a long time, so I finally decided to pull the trigger. I am SO satisfied with it! It's like having a regular laptop and a tablet all in one. If you haven't tried Chrome OS yet, you are missing out!
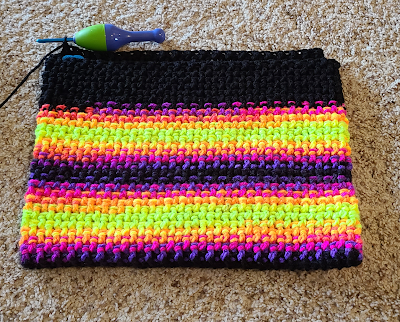
Anyway, the only thing this new laptop was missing was a nice sleeve to keep it safe. So I sat down and got to work on one. I went with the Rice Stitch and some Red Heart Super Saver Stripes. I am so happy with how it turned out!
Note: This was designed to fit my laptop, but it does stretch to go over my Windows Laptop that is a 15" laptop. You can customize this pattern by measuring the base chain to make it the same length as your laptop. Your number of stitches will be different, but you can still follow the basic pattern based off that.
Materials Needed:
- I used a whole skein of RED HEART Super Saver Yarn, 5 ounces, Bright Stripe, and once that was used up, I finished with Red Heart Super Saver in Black.
- Stitch Marker
- Tapestry needle (for weaving in ends)
Abbreviations:
Ch = Chain
fpdc= front post double crochet
bpdc = backpost double crochet
Sl st = slip stitch
Pattern:
Chain 47

Round 1: DC in 4th chain from hook. Space DC in each chain until you reach the end. Then turn and do one DC in the backside of the chain all the way around until you reach the chain three.

Round 3-28: continue alternating fpdc and bpdc while working in the round. You will always put a fpdc in a bpdc and every bpdc will always go in a fpdc.

Row 29: fpdc in next stitch, bpdc in next stitch, repeat until you reach the other edge, 47 stitches total, turn.
Row 30: skip 1st stitch, ch2 (doesn't count as stitch) *bpdc in next stitch, fpdc in next stitch, repeat from * until you reach 43 stitches, turn.
Row 31: skip 1st stitch, ch2 (doesn't count as stitch) *fpdc in next stitch, dpdc in next stitch, repeat from * until you reach 41 stitches, turn.
Row 32: skip 1st stitch, ch2 (doesn't count as stitch) *bpdc in next stitch, fpdc in next stitch, repeat from * until you reach 39 stitches, turn.
Row 33: skip 1st stitch, ch2 (doesn't count as stitch) *fpdc in next stitch, dpdc in next stitch, repeat from * until you reach 37 stitches, turn.
Row 34: skip 1st stitch, ch2 (doesn't count as stitch) *bpdc in next stitch, fpdc in next stitch, repeat from * until you reach 35 stitches, turn.
Row 35: skip 1st stitch, ch2 (doesn't count as stitch) *fpdc in next stitch, dpdc in next stitch, repeat from * until you reach 33 stitches, turn.
Row 36: skip 1st stitch, ch2 (doesn't count as stitch) *bpdc in next stitch, fpdc in next stitch, repeat from * until you reach 31 stitches, turn.
Row 37: skip 1st stitch, ch2 (doesn't count as stitch) *fpdc in next stitch, dpdc in next stitch, repeat from * until you reach 29 stitches, turn.
Row 38: skip 1st stitch, ch2 (doesn't count as stitch) *bpdc in next stitch, fpdc in next stitch, repeat from * until you reach 27 stitches, turn.
Row 39: skip 1st stitch, ch2 (doesn't count as stitch) *fpdc in next stitch, dpdc in next stitch, repeat from * until you reach 25 stitches, turn.

Round 40: Rotate your work and put two SC in the side of the DC from the previous row. Continue to work two SC and the side of each row until you reach the end of the flap then put one SC in each stitch around until you get back to the other side of the flap and go back to two SC and the side of each row until you get to the top of the flap then one SC in each DC until you reach the end of the round
Round 41-42: One SC in each SC around.

Fasten off.
Comments
Post a Comment