I had been wanting to make a wrap, and I am such a fan of the granny stitch, I decided to give this a go! Materials Needed: 9mm Crochet Hook OPTIONAL: 1-2 pencil grips , like these , to make your crochet handle more comfortable Bernat Baby Blanket Big Ball Baby Lilac , 2 balls Stitch Marker Tapestry needle (for weaving in ends) Optional: Tassel Maker Pattern: Row 1: Ch 4, in 4th ch from hook 2dc, ch2, 3dc. Row 2: Ch 3 (counts as stitch), turn, 2dc in the first dc, ch 1, 3dc ch 2 3dc in ch2 sp, ch1, 3dc in the top of the ch3 from the previous row. Row 3: Ch 3 (counts as stitch), turn, 2dc in first dc, ch 1, 3dc in ch1 sp, ch 1, 3dc ch 2 3dc in ch2 sp, ch1, 3dc in ch1 space, ch 1 3dc in the top of the ch3 from the previous row. Row 4-25: Ch 3 (counts as stitch), turn, 2dc in the first dc, ch 1, *3dc in ch1 sp, ch1. Repeat from * until you reach the ch2 sp, then 3dc ch 2 3dc in ch2 sp, ch1. Then repeat fro...
I created this project for my nephew's birthday. I had recently purchased the Michael's Loops & Threads circular knitting machine, and wanted to use this to make him something special. I finished everything off with crochet.
This isn't really a pattern, more of a guideline on how I created this, since I didn't really know what I was doing with the machine yet and didn't keep track of how many rows I was doing.
So here's what I did:
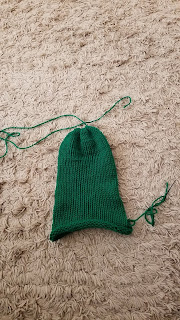
I started by knitting a panel on the machine but didn’t keep track of rows. I was trying to get it around the size of double the width, but I just eyeballed it. I used Red Heart Super Saver Green.
Then I folded in half, and singled around the two sides, leaving the bottom open for stuffing. Here it is below partially stuffed to give you an idea of what it looked like at that point:
For nose, I crocheted two by:
Row 1: magic circle, 6 singles in circle, slip stitch in first stitch.
Row 1: magic circle, 6 singles in circle, slip stitch in first stitch.
For eyes, I crocheted two by:
Row 1: magic circle, 6 singles in circle, slip stitch in first stitch in black.
Row 2: Change to blue and 2 singles in every stitch, slip stitch in first stitch.
Row 3: *single in next 2 stitches, then 2 singles in same stitch* around the row and slip stitch in first stitch.
Row 4: Change to white *single in next 3 stitches, then 2 singles in same stitch* around the row and slip to join in first stitch.
Row 5: *singles in next 4 stitches, then 2 in same stitch* around the row and slip to join.
Here they are below before I finished with the white:
For mouth:
Row 1: chain 50. Half double in 3rd ch from hook. Double in next stitch. Triple, chain 2, triple in next stitch. Double in next stitch. Half double in next stitch. Single in next stitch. Slip stitch in next stitch. Continue with single, half double, double, triple-chain 2-triple, double, half double, single, slip stitch 5 more times across for 6 teeth.
Row 1: chain 50. Half double in 3rd ch from hook. Double in next stitch. Triple, chain 2, triple in next stitch. Double in next stitch. Half double in next stitch. Single in next stitch. Slip stitch in next stitch. Continue with single, half double, double, triple-chain 2-triple, double, half double, single, slip stitch 5 more times across for 6 teeth.
For the eyes, nose, and mouth, I left a tail 3x as long as the circumference or length (mouth) to make sure I had enough to sew it on.
I partially stuffed the pillow and sewed the above on. The face was crocheted with 4.5mm crochet hook.
For scales, I did the same stitch as the teeth directly into the pillow, using a 5.5mm crochet hook. To close, I did the same stitch as teeth across the bottom.


Comments
Post a Comment